
Media view & timing
Every file has a Media view beside the usual Text view: a timeline, for lining your translation and recordings up against the original, with the file’s lines below it. Switch to it with the view icons in the header. A Bible book or a document shows its current chapter on the timeline: recorded verses on their takes, and the rest as dashed stand-ins. Play all runs on into the next chapter, and the timeline follows. A file with no chapters shows whole.
The Media view’s layout
Section titled “The Media view’s layout”The Media view has one top bar. On the left are the file’s tools: Sources (an icon, shown when the film and sources tools are on; see Linking a video), Timing (for example “Follows source ⌄”; see Timing), Check, and History. On the right are the status ring, the view icons, Panels (a grid icon), and ⋯.
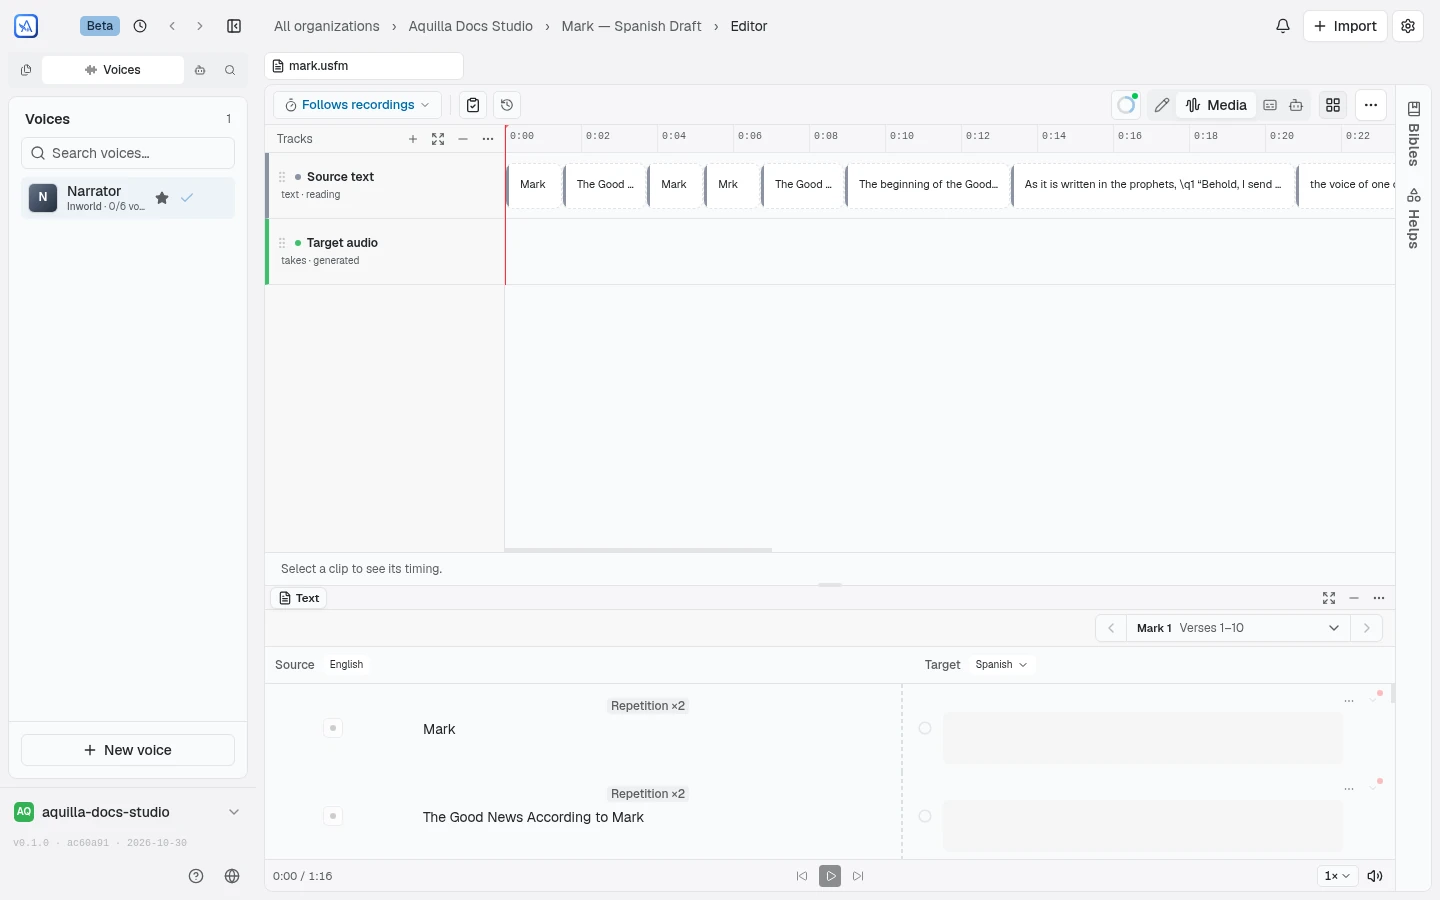
The timeline runs across the top. Below it are two areas holding the Film (when a video is linked), the Text and the Station (see The Station), side by side or as tabs of one area. The Station starts as a tab behind Text. Each area has a thin strip with its tabs, then Full screen, Fold, and ⋯ (to move the panel to the other area). Double-click a tab for full screen, or drag it to the other area. Playback is a thin strip along the bottom: the time on the left, previous, play and next in the middle, speed and volume on the right.
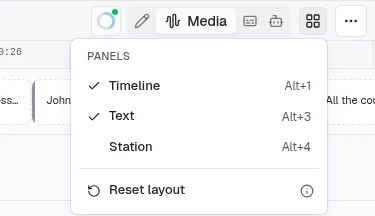
- Panels (⌘/Ctrl+\) lists Timeline, Film (only when the file has a film), Text and Station, each ticked while it shows. ⌥/Alt+1 shows Timeline, +2 Film, +3 Text and +4 Station. A folded panel takes no room, and this menu brings it back. Reset layout returns the file to its starting layout; its (i) lists the shortcuts.
- Full screen (⌘/Ctrl+Shift+F) folds every other panel and the sidebar, and keeps the playback strip. Esc or Restore unfolds exactly what it folded. ⌘/Ctrl+Shift+H folds a panel.
Your layout is remembered for you, per file; your teammates keep their own. A file starts with a layout that suits its kind: a dubbing file with the film large beside the text, a subtitles file with a shorter timeline, and a scripture book with the timeline tall above the text.
In the Media view, clicking a line opens it on its Recording tab.
The two tracks
Section titled “The two tracks”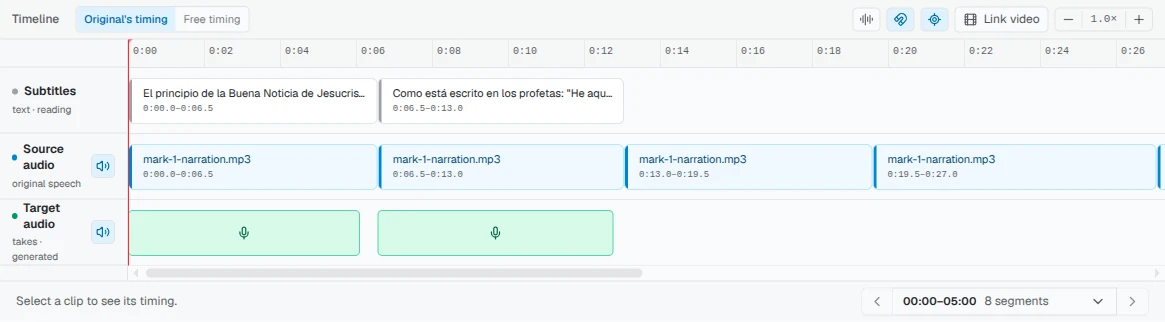
The timeline stacks up to four rows:
- Source audio: the original recording, exactly as imported. It’s fixed; you can’t move or trim it.
- Target audio: your translation’s clips, whether recorded takes or generated voice. This is the track you edit. Once a clip’s take is validated, a small check mark shows on it too, at the right end of its name bar (see Name bars); it’s read-only here, so validate or unvalidate from the editor, a cell’s Recording tab, or the Takes strip instead.
- Source text: the file’s lines or subtitle cues as chips, shown when the file has them. (Older projects may still call this row Subtitles; the name is per project.)
- Untimed: a parking strip that only appears when a clip has no timecode yet.
The timeline’s corner reads Tracks, with + (Add track: an audio track or a folder), Full screen, Fold, and ⋯. That ⋯ holds the timeline’s settings: Undo, Redo and the Blade, Play generated voices at original quality, Skip lines with nothing to play, Snap to neighboring edges, Follow playhead, Show the track names, Zoom, and Row height.
An audio row shows its mute button only when it has something to play. Source audio has one when the file has an original recording or a linked video with its own sound. Target audio and any added track get one once they hold a take. A row you have muted keeps its button so you can always unmute it.
On a target clip, drag its body to move it, or drag either edge to trim it (trimming only cuts the ends; it never changes the audio’s speed). A clip can’t be dragged past a neighboring clip’s start, so clips stay in order, and the shortest a clip can be is 0.2 seconds. Snap to neighboring edges, when ticked, magnets a clip’s edges to the clips beside it as you drag. A take keeps a place in each timing: dragging it moves it the same distance in both, and one Undo puts both back. Hover a take for its ⋯, which opens the same menu as a right-click.
Name bars on takes
Section titled “Name bars on takes”Every take that is tall enough has a name bar along its top, in its track’s colour, as in a video editor. It shows the take’s name (a piece of a split take reads like “Take 2 · 1 of 2”), a sparkle in front of it when the take is an AI voice, and the take’s voice when that isn’t the line’s voice. A validated take has its check at the right end. Point at the take and its buttons appear there: play, record and ⋯, as many as fit. Double-click the name to rename the take, or drag the bar to move it, just as you would drag the take itself. On a take too short for a bar, the sparkle and the check stay in its corners, and a short row says “Voicing as …” while its line is being voiced. Tab and Shift+Tab reach a bar’s buttons from the keyboard.
Every take’s waveform has the same look: a light ground in the track’s colour, and a waveform a step darker than the track. While a take plays, the part already played is strong and the rest faint. A muted track’s takes show at half strength. The same waveform appears in the recorder and on a line’s Recording tab. The green and magenta shades are slightly different from before, and the swatches in a track’s colour menu match what the track shows.
Hiding a track on your screen
Section titled “Hiding a track on your screen”Right-click a track (or open its ⋯ menu) and choose Hide track, or Hide {count} tracks with several selected. The track leaves the timeline on your screen only, for this file, and stays hidden on this device. Nobody else’s timeline changes, and anyone, viewers included, can hide tracks. A hidden track keeps its takes and still plays. Folders can’t be hidden, and a track being recorded into or dragged can’t be hidden (“Can’t hide a track while it’s recording or being dragged”).
While anything is hidden, the top bar shows Hidden tracks ({count}), “Hidden for you, on this device”, with Show {name} for each track and Show all tracks when two or more are hidden.
A line parked with Hide cell is drawn faded on the timeline, with no play or record buttons, and its takes never play, including in Play all. Show cell brings it back.
Splitting a take into pieces
Section titled “Splitting a take into pieces”A recording can be cut into pieces on the timeline. Right-click a take and choose Split here (Split at the playhead from its ⋯), or press S to split the selected take at the playhead. The Blade tool (B) cuts where you click. Cutting works on every file, including one that follows its recordings. A split take is still one take, now made of pieces: its label reads like “Take 1 · split in 2”, and the Recording tab shows how many pieces it has. The take’s right-click menu also offers Approve this piece and Delete this piece, so you can work on one piece at a time.
Changing the voice of one line
Section titled “Changing the voice of one line”A take’s right-click menu also has Change voice, beside Regenerate voice. It keeps the recorded words and timing and makes the take sound like the line’s assigned cloned voice; nothing is spoken afresh from text. Pick a quality from its submenu: Fast, Standard, or High (higher takes longer). The original take is kept, and the converted take plays in its place. A toast says “Changing this line to {name}…” and then “This line is now in {name}’s voice”. The item is greyed out, with the reason as its label, when the voice has no reference clip or when a voice is cloned from this take.
Imported lines and cues are locked against dragging by default, project leads included: the timings came from the file you imported, and a dragged chip moves a line for the whole team with nothing to compare it against afterwards. Only a Maintainer can turn the lock off, from Project Settings → Media, and the timeline shows an amber “Timings unlocked” badge for as long as it’s off, so it’s never left that way by accident. A line someone added by hand into the timeline can still be dragged either way; recordings can still be placed against their lines as usual.
The Station
Section titled “The Station”The Station is a panel for working on one recording at a time: listen to it at any speed, trim it, cut a part out, add more sound, set its volume and fades, approve it, and save the result. It is a tab behind Text, and Station in the Panels menu (⌥/Alt+4) brings it forward. With nothing open it reads “Pick a recording on the timeline, or choose Edit in the Station from a take’s ⋯ menu.”
Open a recording in one of two ways:
- Right-click a take on the timeline, or use its ⋯, and choose Edit in the Station, the first item.
- Click the waveform icon, Edit in the Station, on the take in a line’s Recording tab.
While the Station is showing, clicking another take on the timeline opens that one. The imported source recording opens too, but only to listen to: it is named Source recording, and the Station says “This is the source recording, so it can’t be edited here.”
The header names the recording and its line (for example “Take 2 · line 4”), then the character, where it is placed (“Placed on line 4 and line 9 · open on line 9” when two lines use it), its approval (Waiting or Approved) and its version. Undo and Approve sit at its right, and Save joins them once something isn’t saved. The (i) beside the name opens a short explanation of every control and key, right where you are.
Listening and trimming
Section titled “Listening and trimming”Drag across the waveform to select a part, or click to place the cursor. Space plays the selection, or the whole recording when nothing is selected. The speed menu changes the speed without raising the pitch, and Loop repeats the selection. Zoom runs from 1× to 16×, with a scroll bar under the waveform.
To trim, drag the Start or End flag, or the waveform’s edge. You can also click Start or End under the waveform and type a time to the hundredth of a second, such as 0:01.25. With a part selected, Keep this trims the recording to it. Trimming changes what the line plays, never the recording itself.
Volume and fades
Section titled “Volume and fades”Point at the waveform to see its volume line, from −12 to +6 dB. Drag it up or down, or click the quieter and louder buttons for 3 dB steps. To fade in or out, drag the round knob at a top corner inward; click the knob to turn the fade off again. A fade is drawn as a line from silence up to full level, and the part it quiets is tinted blue. Volume and fades belong to the clip, not to the recording. The timeline plays every take at its own volume and fades, and exports apply them too (see Exporting your work).
Cutting, inserting and saving
Section titled “Cutting, inserting and saving”With a part selected, Delete this cuts it out. Insert audio here adds sound at the cursor, from From the library (the file’s other recordings), From a file…, or Record now. Record now counts you in at the cursor using your recorder’s countdown and microphone settings, records there in red, and stops with Stop; then Keep puts the new sound in, or Record again tries once more.
Cuts and inserts wait until you save. The line under the name says what isn’t saved (“Not saved: a part deleted”), and Undo takes the unsaved changes back first. Each recording keeps its own unsaved changes in this browser: “Your changes to {name} are kept until you save or undo them.”
- Save (⌘/Ctrl+S) saves over the take on every line that uses it. The take keeps its name and its history and goes back to Waiting for approval, and Undo brings the old sound back: “Saved over {take} on {lines}. Its history is kept, and Undo brings the old sound back.”
- The ▾ beside Save also offers Save over this take and Save as new version. A new version keeps the original beside it, named like “Take 2 · version 2” in the takes lists. When the recording is used on more than one line, choose For this clip only or Everywhere.
More in the Station’s ⋯ menu
Section titled “More in the Station’s ⋯ menu”The ⋯ in the Station’s strip (its hover reads “More: remove noise, change the voice, history”) holds three items:
- Remove noise… and Change the voice… each make a new version of the recording, keeping its track, trim and places.
- History lists what happened to the recording, with who and when: “Recorded”, “Saved over: a part deleted · used on line 4”, and “Version 2 saved: a part deleted, audio inserted · used on line 331”. Unsaved changes are listed last.
A recording longer than ten minutes can still be trimmed, approved, looped and given volume and fades; cutting and inserting say “Too long to cut or insert here yet; trims, volume and fades work.”
Keys work while the Station has the focus: Space plays, K keeps the selection, ⌫ deletes it, I inserts, A approves, L loops, + and − zoom, and ⌘/Ctrl+Z undoes. The timeline’s own S and B don’t reach past it. Esc first closes Insert or clears the selection, and only then leaves full screen.
Undo and redo
Section titled “Undo and redo”Ctrl/Cmd+Z undoes your last step, and Undo and Redo are also in the timeline’s ⋯, naming the step, for example “Undo: Cut take”.
You have one Undo history per project, across all its languages, and it follows you to any device where you’re signed in. Nobody else sees it. Undoing a step made in another language opens that language first. Besides edits, takes, rows and tracks, you can undo recording, uploading or generating a take, changing its voice, removing noise, changing a take’s volume or fades, saving a new version in the Station, linking a film, pairing heard lines, assigning characters, editing source text, and making lines from a recording. Bulk runs add no steps.
The History button in the top bar opens a panel that lists every step you can undo, newest first, each with its file and language. Click Undo on the newest step to undo just that one, or Undo to here on an older step to undo everything newer along with it. Steps you have undone appear under Can redo. Undo never overwrites someone else’s work: a step someone has changed or approved since is skipped with the reason, for example “These lines have changed since you made them, so Undo left them as they are.”
Transcribing a section
Section titled “Transcribing a section”A row under the timeline lanes lets you run speech-to-text on just the sections you pick, instead of the whole file: click a chip to select it, then Ctrl/⌘-click or Shift-click chips to select more sections. The button reads Transcribe section (or Transcribe N sections) once something is selected, and Clear selection resets the pick. Unlike transcribing the whole file, this re-runs on a section even if it already has a transcript.
Timing: Follows source or Follows recordings
Section titled “Timing: Follows source or Follows recordings”The Timing control in the top bar (it shows the file’s choice, such as “Follows source ⌄”) decides how long each line is on the timeline and in playback. The choice is set per file, for everyone on it:
- Follows source: “Lines keep their times from the source, and its pauses stay.” The translation is fitted to the original. If a target clip overlaps a neighbor, it’s flagged in red naming which side and by how much (for example “Overlaps the next dub, −1.8s”); a clip that runs past its section without colliding gets a milder amber warning (“Runs 2.3s past the section”).
- Follows recordings: “Lines play back to back, each as long as its recording.” The source plays only for as long as its line lasts, and is cut where the line ends. Nothing overlaps and nothing “runs long,” so those warnings don’t apply. The source’s own times are not shown: line cards drop their time range, and Edit timestamps on a line is unavailable (“This file follows its recordings, so the source’s times aren’t shown. Switch its Timing to Follows source to edit them.”). If someone placed a take a little after its line’s start, that pause is kept and plays as silence in the line. To leave a pause yourself, drag a take to the right along its line; the line grows to hold it and the lines after it move along. Drag it back to the left to shorten the pause. A take whose length isn’t known can’t be moved this way. Takes on added tracks play and set line lengths too: a line lasts as long as its longest take. For music or effects, untick Sets line lengths in the track’s ⋯ to make it a layer (“layer · doesn’t set line lengths”); its takes keep their own length and never stretch a line.
The menu opens under “What decides how long each line is” (its (i) explains the two choices), shows how long the file comes out with each choice, and ends with “Muting a track only changes what you hear. It never moves anything.” The playback strip shows the file’s length before you play.
A new file starts on Follows source. A file timed to a film (a linked video, or cues that transcribe a film) always follows its source: the control shows Follows source as plain text, and clicking it says “This file’s lines are timed to the film, so it always follows its source.” A file with no times and no source recording has nothing to follow, so it follows its recordings, and the menu greys Follows source out with “This file has no times and no source recording to follow.” On such a file, a line nobody has recorded yet takes a stand-in length worked out from its words, drawn with a dashed outline and no time; Why some lines show no times at the foot of the Timing menu explains it, and recording the line replaces the stand-in with the recording’s length.
While a file follows its recordings, Play all plays the takes back to back, and the red playhead on the timeline follows the programme clock, so you can see which take is sounding. Skip lines with nothing to play, in the timeline’s ⋯ and ticked by default, steps over lines with no take; untick it to hear them as silence for their length. It shows only on a file that has such a line, and is remembered on this device. Hidden lines are always skipped.
If you switch to another browser tab while something is playing, Aquilla pauses it, and plays on from the same place when you come back. Something you paused yourself stays paused.
Switching between the two changes no recordings and no times: it’s safe to try either and switch back. Changing a file’s timing needs Project lead access or above; everyone else sees the current choice as plain text, and clicking it says who can change it. When someone else changes it while you have the file open, a Timing changed notice says so.
Linking a video
Section titled “Linking a video”Film in the Sources menu (Project lead access or above) links a video to a file so it plays alongside the timeline. Once linked, the menu opens with the film’s name, Change or clear the film…, and Fold the film or Show the film panel. Linking is project setup, done once before a file reaches translators and dubbers, not a routine edit. Once a video is linked, each subtitle row’s action rail gets a Play from this cue button that seeks the video to that cue’s timestamp and starts it playing. On a caption file with timings but no video, the same button starts the timeline’s silent clock at that cue. While a row’s line is the one playing, its button turns into Pause, and pressing it stops playback. The playing row also carries a faint tint and a bar at its start edge, and the mark moves from row to row as playback runs; it stays on a line through the silence after it. Video plays on the film’s times, so a file with a linked video always follows its source. Linking a video to a file that follows its recordings first asks “Linking a film makes this file follow its source”, with Link the film: no recordings or times change, and clearing the film lets the file follow its recordings again. You made that change yourself, so Aquilla does not show you the Timing changed notice.
Making rows from a linked video
Section titled “Making rows from a linked video”A file with a linked video but no rows yet shows one card, headed Linked to a film (Linked to a film on YouTube for a YouTube link). A Maintainer can attach the video’s captions there, and they become the file’s rows. Below that sit two quieter ways in: “make rows from an audio or video file”, and, when the video is not on YouTube, “make rows from the film’s own sound”.
The second one opens Make rows from the film’s own sound. Aquilla saves a copy of the sound with the file, splits it into rows where the speech pauses, and transcribes them; the rows are timed to the video. Pick a Sound track if the video has more than one, then choose Make rows. The card shows “Downloading the film’s sound…”, “Saving a copy of the sound…”, then “Making rows…”, and Cancel stops it with “Stopped. Nothing was saved.” A long transcription can reach the hosted service’s limit; it pauses and carries on by itself. A YouTube video’s sound can’t be read this way. Its owner can download the captions or the video file from YouTube Studio instead.
The Sources menu shows only when Show the film and sources tools in the media view is on in Project Settings → Media. It is off by default for projects of books and documents and on for others; hiding it removes nothing already attached, and a file with a film keeps the film’s rows.
Extracting subtitles from a subtitle file
Section titled “Extracting subtitles from a subtitle file”A time-ordered file that has a clip on it but no text yet can get its source lines from the subtitle file that came with the clip. Open the Sources menu on the timeline and choose Subtitles (its badge reads “not imported” until cues exist; once the file has text, the row is greyed out and shows “N imported”). Maintainer access is needed.
In the Extract subtitles dialog, choose a .vtt, .srt, or .sbv file.
The dialog summarizes it (“N cues, …”) and notes anything it adjusted:
short-form timestamps read as minutes and seconds, lines with no usable text
that were skipped, and cues with no timing, which become translatable rows
but do not appear on the timeline. A file whose times look like video frame
numbers written as hundredths of a second gets the same Fix the times or
Keep as is choice as an upload: see
Preview before anything is written.
Confirm with Extract N cues. Aquilla
refuses to extract into a file that already has source lines, so cues are
never duplicated.
Attaching captions as a text track
Section titled “Attaching captions as a text track”A caption file can also become its own text track on the timeline, separate from the file’s own lines. Open the Sources menu and choose Attach captions. Attaching needs Maintainer access and track editing, which is on by default. If Let maintainers add and edit timeline tracks has been turned off under Project Settings → Media, the item is greyed out and says Enable track editing in Project settings.
In the Attach captions to window, choose a Caption file (.vtt,
.srt, or .sbv). Each caption shows on its own line; its pencil opens the
wording and the start and end times for editing, and a caption with a bad time
is counted (“1 needs attention”) until you fix it. The X beside a caption
(“Remove caption {number}”) drops one you do not want. Under Destination track, the default is
New caption track; give it a Track name. To replace an existing track
instead, pick it, read how many segments will be overwritten, and tick
Overwrite the existing content in this track. Then choose Add caption
track (or Overwrite caption track).
Aligning a script
Section titled “Aligning a script”Align script in the same Sources menu lines up a plain text script
against the file’s original recording. It needs the same access and setting
as Attach captions, and it appears only when the file has one source
clip. In the Align script to window, paste the script or choose a Script
file (a .txt file in UTF-8, at most 200,000 characters). Paragraph
breaks define the segments. Choose Align script, then review each
segment’s wording and start and end times. Each segment shows an Initial
word match percentage, and Listen to segment plays its stretch of the
recording. A segment Aquilla is unsure about carries an I reviewed
segment box that you must tick before Use aligned segments saves the
result as a track. Edit script takes you back to the script.
Recording your translation
Section titled “Recording your translation”Choose Record audio on a clip to open the recorder. Press Start to begin, Stop to end the take, then Retake to try again or Save (press Enter) to keep it. Space plays the take back first. Before you save, drag the two trim lines on the waveform to keep only part of the take. The readout shows “{start} – {end} · {length}”, the hint reads “Space plays · drag a line to trim”, and Reset trim restores the full take. A take plays only its kept part. The recorder, the Recording tab, and the timeline share one waveform. A Generate TTS button next to it produces a spoken take with the project’s voice engine instead, useful for a quick placeholder or when recording isn’t practical.
Every attempt is kept, not just your last one: a Takes strip lists each one by name (Take 1, Take 2, and so on), with controls to preview, rename, or delete any of them. A denoised copy of a take is labeled Cleaned, and you can revert to the original audio at any time.
Formats and limits
Section titled “Formats and limits”Importing an audio or video file is capped at 2 GB. A large file uploads in parts, so a brief dropped connection resumes the upload instead of starting over. Your own recordings upload in a compressed format; generated voices upload compressed too but keep an original-quality copy alongside it, and a playback-quality toggle lets you choose between the smaller compressed version and the original when listening back.
Who can do what
Section titled “Who can do what”Recording, trimming, and moving clips need Contributor access or above; below Contributor, the timeline is read-only, so you can watch and listen but not edit. Linking a film needs Project lead access or above. Changing a file’s Timing needs Project lead access or above; turning off the timing lock needs Maintainer access.
A maintainer sets the timing lock and track editing for the project in Project settings → Media, where each box keeps its explanation behind an (i). While a box follows the organization’s default you can still tick it: that sets the choice for this project, and the menu beside it switches to Set for this project.
Help assistant
AI answers from the Aquilla docs — may make mistakes.